


Rearz Crafts: DIY Easter Basket
Posted by E on 2025 Apr 9th
Hello again, Rearz friends!
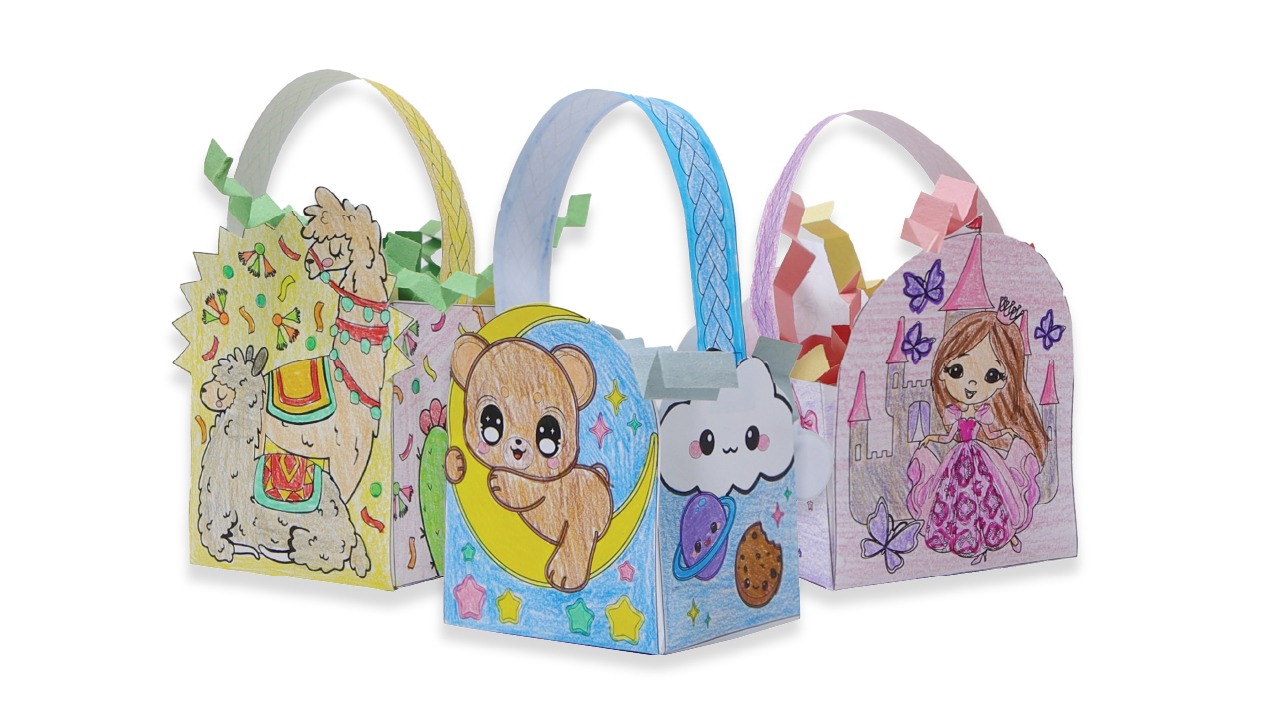
Easter is coming soon, and we have a super cute and exciting project to get you ready—let’s make your very own Easter basket, Rearz style! This is a perfect craft to do with your little friends or ABDL family, and it’s a great way to show off your decorated eggs or share some yummy treats! Are you ready to hop into this fun project? Let’s go!
Downloadable Rearz Easter Basket Template:
[Click Here To Download]
Printin instruction can be found at the bottom of the blog.
Would you prefer a video tutorial? Check the bottom of the blog a link to the video tutorial.
What You’ll Need:
-
A grown-up helper (because scissors and glue need careful hands!)
-
A printer (to print out your basket template)
-
Thick paper (8.5 × 11 inches - cardstock works best, but regular paper is fine!)
-
Coloured paper (for your basket filling!)
-
Crayons, markers, or coloured pencils (to decorate your basket)
-
Stickers, glitter, or anything sparkly (because who doesn’t love sparkle?)
-
Scissors (be careful! Ask your grown-up for help)
-
Glue or tape (to put it all together)
Step 1: Print Your Basket Template
Ask your grown-up to help you print out the Easter basket template. Just load up the paper, press print, and ta-da! Your basket pieces will appear! If you want to be super creative, you can design your very own basket!
Step 2: Time to Decorate!
Now, let’s get decorating!
-
Colour your basket with your favorite colours! You can make cool patterns, or even colour in your favorite Rearz characters!
-
Add glitter, stickers, or any sparkly fun stuff to make it shine!
-
You can also add flowers, Easter eggs, or bunny ears to make it extra special!
Step 3: Cut Out the Pieces
Ready to cut? Grab your scissors and carefully cut out your basket pieces! Follow the lines—snip…snip! If you need help with tricky cuts, just ask your grown-up!
Step 4: Assemble Your Basket
Now that your basket is all decorated, let’s put it together! To make your paper basket, fold the little tabs along the lines, add a bit of glue or tape, and press them onto the matching edges. For the handle, put glue or tape on the square boxes at each end and stick them inside the basket. Hold everything in place for a few seconds, and—ta-da!—your basket is all set for goodies!
Step 5: Make Your Own Basket Filling!
Want to make your basket even more special? You can make your own basket filling by cutting up extra coloured paper! You can crunch it or fold it into little bits! It’ll give your basket a fun and crinkly look. Don’t forget to ask your grown-up to help with the cutting!
Step 6: Fill with Easter Treats!
Now for the best part—fill your basket with yummy treats like chocolates, candies, and maybe even a surprise! You can put anything you like in your basket, and it’s all yours to enjoy!
Step 7: Share the Easter Joy!
Once your basket is all done, it’s time to share your Easter joy! You can give your basket to a friend, mommy, daddy, or even keep it for yourself! Imagine their big smiles when they see the wonderful basket you made!
Happy Easter, Rearz friends!
We can’t wait to see all your colorful baskets! Be sure to share your creations with us on social media so we can see how amazing your baskets turned out! Until next time, keep crafting and spreading Easter cheer!
How to Print Your Basket:
-
Open your document: Start by opening the document you want to print.
-
Select Print: Go to the “File” menu and click on “Print,” or press Ctrl + P (Windows) or Cmd + P (Mac).
-
Choose Printer: Select the printer you want to use.
-
Scale the Document: Find the “Scale” or “Fit to Page” option and set the size if needed (like 150% or 200%).
-
Preview Your Print: Double-check the preview to make sure everything looks great!
-
Print: Press “Print” and get your Easter basket pieces ready to go!
Happy crafting, friends! We hope your Easter is just as sweet and colorful as your DIY basket!