


How to apply a Diaper - Hook and Loop Fasteners vs Adhesive Tapes
Posted by Kevin Pepper on 2020 Feb 4th
Good morning, good afternoon, good evening or good night depending on when you’re reading this blog entry.
With the release of our new Incontrol Elite Hybrid Diaper I thought I would take a minute to talk about some of the new features and explain a little about the difference between Hook and Loop fasteners Vs Adhesive Tapes.
This is our most requested diaper of 2019 and we’re happy to bring this new product to you, our most valued customers. Much like our Barnyard Diaper the new Incontrol Elite Hybrid also features a hook and loop system. In addition, this diaper features our brand new fastening guide to help caregivers of all types achieve the right fit when placing the fasteners.

Most disposable diapers today come with one of 2 styles of closures, the more common adhesive tapes or the newer hook and loop fasteners.
While adhesive tapes have been around since the very early disposable baby diapers and have been the main stay ever since, hook and loop fasteners are still relatively new and have been around since the 1990’s. With adhesive tapes, re-positioning the tapes to get the perfect fit will sometimes cause the diaper to rip or the adhesive to lose its tackiness, with hook and loop fasteners you’re able to unfasten and refasten the fasteners as many times as needed to get the best fit possible.
![]()
When pressed together, the hooks cling tightly to the loops, creating a firm bond that can be quickly and easily separated by peeling the panels of material apart. Today, the hook and loop fastener is considered one of the most widely-used inventions of the 20th century.
The use of hook and loop fasteners on diapers substantially overcomes the problem of reduced fastener reliability due to contaminants such as talcum powder, baby oil or lotions and can provide secure fastening to hold the diaper in place and allow repositioning of the fastener for the perfect fit as well as an easier ability to inspect the condition of the diaper.
Diapering with hook and loop fastening system
Keep in mind that the hook and loop fasteners do have a small area of adhesive which is there for 2 reasons.
1. To keep the fasteners in place until the diaper is being fastened.
2. When you remove the diaper and “ball up” for disposal you can use the adhesive part to keep it together.
Because there is adhesive on these tapes you must be careful when using things that can contaminate the adhesive, for example powder and lotions like zinc creams can contaminate the adhesive rendering them ineffective.
Steps for the best diapering technique
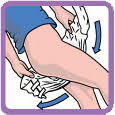 Step 1: With the user lying on their side, slide the diaper between their legs from front to back making sure the diaper is even in the back with the front.
 Step 2: By putting tension at the absorbent area you maximise contact with the skin giving you less chances for the diaper to leak. You want to use the fasteners to pull the absorbent layer tight against your skin.
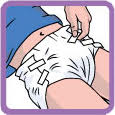 Step 3: The hook and loop fasteners should be applied over the landing zone. Once you know the number you like your tapes at, make a mental note.
Fasteners need to point toward their adjacent tapes. For example, you should always start with the bottom right fastener pointing directly at the bottom left fastener. It doesn’t matter which side you start with. Always do one side then the other.
After the bottom fasteners are placed proceed to the top 2 fasteners in the exact same way.
Step 3: The hook and loop fasteners should be applied over the landing zone. Once you know the number you like your tapes at, make a mental note.
Fasteners need to point toward their adjacent tapes. For example, you should always start with the bottom right fastener pointing directly at the bottom left fastener. It doesn’t matter which side you start with. Always do one side then the other.
After the bottom fasteners are placed proceed to the top 2 fasteners in the exact same way.
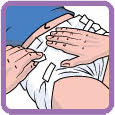 Step 4: After you have all 4 fasteners in place check for comfort and fit make any and all adjustments needed, with hook and loop fasteners you can do this as many times as you need.
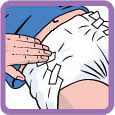 Step 5: After you have all 4 fasteners in place press down on the fasteners and give them a good rub to help keep them in place. Personally, I do this on every diaper and have come to find that it’s very helpful.